
Step 1: Open Settings in Hubbub
Click the gear icon in the left sidebar. Smart Screen Analysis has its own row, below Response Mode and Work Hours.
Optional feature
It's how Hubbub tells a tutorial from a time sink when the tab could be either. It's off until you turn it on, it takes about a minute to set up, and the picture of your screen never leaves your computer.
Your Mac takes a picture of the window you're working in, reads the text out of it on the spot, and throws the picture away. What travels to us is that text — a few lines of what was on the page — with passwords, card numbers and account numbers masked out before it goes, and it's used for one thing: deciding whether what you're looking at is the thing you sat down to do. Nothing is recorded, nothing is stored, and no image ever leaves the machine.
Six short steps and one restart — and Hubbub notices most of it on its own.
Click the gear icon in the left sidebar. Smart Screen Analysis has its own row, below Response Mode and Work Hours.
The toggle won't stay on yet — that's expected. macOS won't let an app read the screen until you've granted Screen Recording permission, so Hubbub opens a dialog instead of pretending the feature is running.
You can close that dialog and nothing happens — the setting stays off and the rest of Hubbub is untouched. This is an enhancement you opt into, not a gate you have to get through.

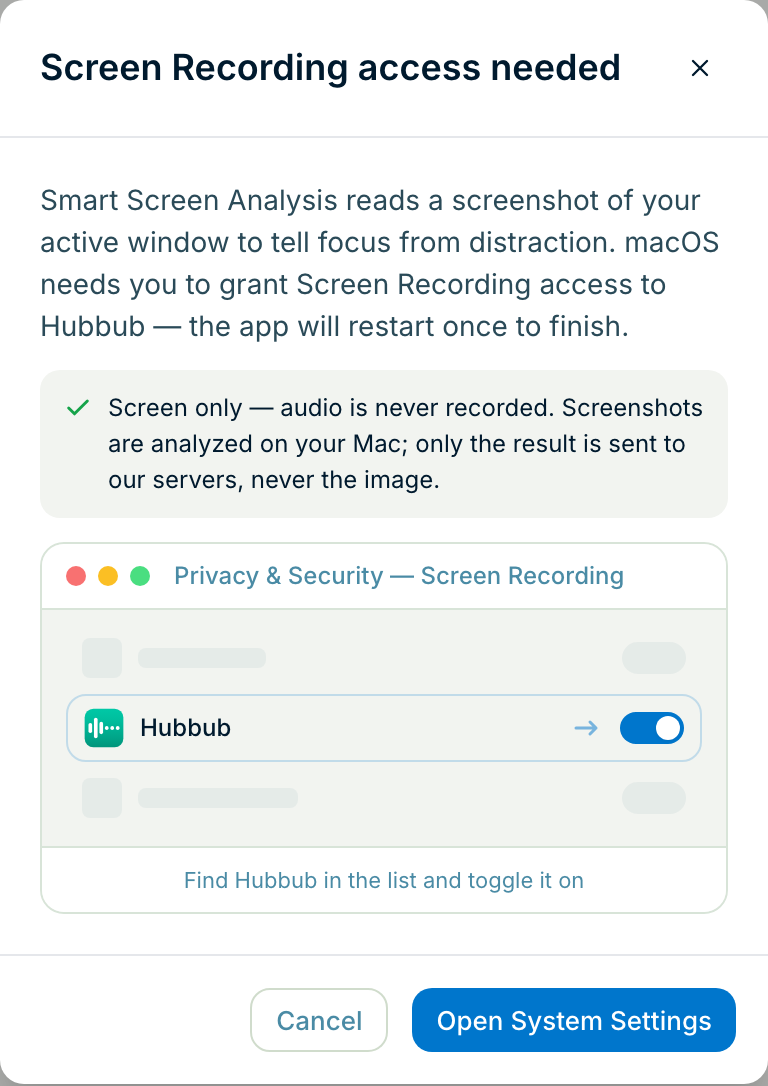
The dialog shows the switch you're about to turn on. macOS may first show its own small box saying Hubbub “would like to record this computer's screen and audio” — click Open System Settings there too.
“Screen and audio” is macOS's wording for every app that asks. Hubbub never asks for the microphone and has no way to record sound.
System Settings opens to Privacy & Security → Screen & System Audio Recording (just “Screen Recording” on older macOS). Find Hubbub in the top list and switch it on; macOS asks for your password or Touch ID to confirm. This is macOS's own permission — you can come back to this pane any time and switch it off again.
Hubbub not in the list? Click + under it and add Hubbub from your Applications folder. And granting it doesn't start anything by itself: whether Hubbub reads the screen is still the toggle you just flipped.
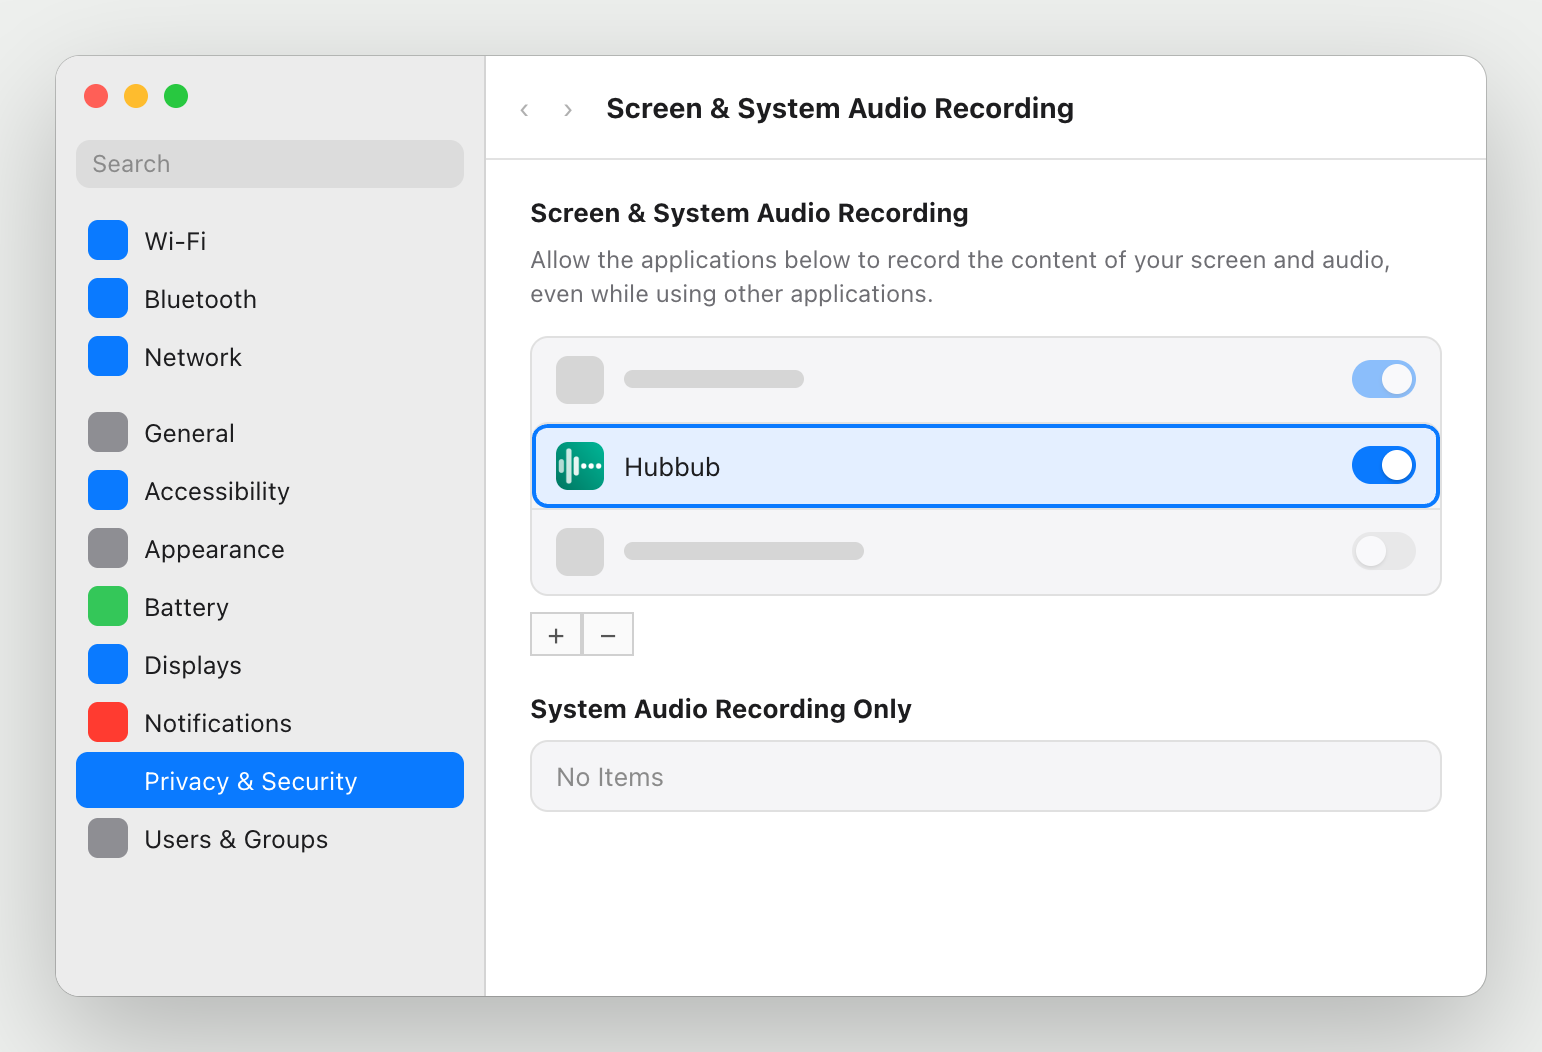
Illustration of macOS — the wording and layout shift a little between macOS versions, and your list of apps will differ.
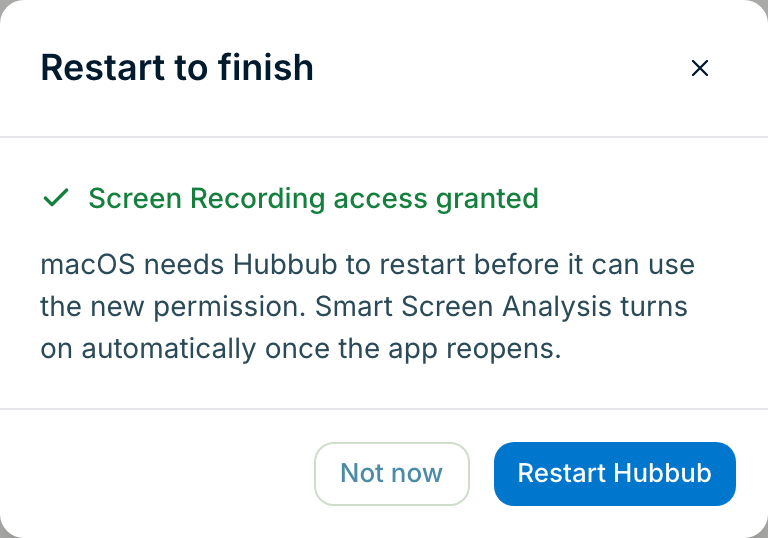
You don't have to click anything to confirm. The dialog is watching for the grant and picks it up within a couple of seconds, then changes to “Restart to finish” on its own.
macOS only hands a new Screen Recording grant to a freshly started app, so Smart Screen Analysis can't take effect in the process that's already running. Click Restart Hubbub and it reopens with the feature on. (If macOS offers Quit & Reopen itself, that works just as well.)
“Not now” is a real option. The choice was saved the moment the permission landed, so Smart Screen Analysis turns itself on the next time you open Hubbub — whether that's from this button, from Cmd-Q and reopening, or from your next reboot. And it re-checks the permission before switching on, so if you change your mind and revoke it in System Settings first, nothing turns on.
Windows has no screen-recording permission to grant, and the reading happens through Windows' own on-device text recognition. Open Settings, switch Smart Screen Analysis on, and that's the whole setup — no system dialog, no restart. Everything below about where the data stops applies the same way.
“Screen Recording” is macOS's name for the permission, not a description of what Hubbub does with it. Nothing is being recorded — there's no video, no reel of your day, and no screenshot that outlives the half-second it takes to read. Here's the whole path, end to end.
On your computer · A picture of your active window
Just the window you're in, not your whole desktop or your other screens.
On your computer · Read, then deleted
Your own machine turns the picture into text and discards the picture. This is the step that never happens anywhere but on your computer — the image has no path off it.
On your computer · Sensitive bits masked out
The text is scanned before it's allowed to leave, and anything shaped like a password, a card number, a government ID number, an account number or a money amount is replaced with Xs. Sites and apps in sensitive categories lose their name here too.
Leaves your computer · The masked text
A few lines of text, used to answer one question: focus, or distraction? That's the only thing that crosses the line, and it's the only reason it's sent.
Illustrative — the order of the steps, not a screenshot of them.
The honest ceiling
We'd rather tell you this than have you find it in the policy later: the masking is good, not perfect. It's pattern-matching running on your machine, and we can't promise it catches every sensitive thing in every circumstance. If something on your screen is genuinely not ours to see even as text, the answer isn't a better filter — it's leaving this switched off, which costs you nothing but a bit of accuracy on the pages Hubbub finds ambiguous.
And the things we never do, with this on or off: we don't record audio, we don't sell your data, there are no ads in Hubbub, and nobody on our side goes browsing through your activity. The full commitment, in detail, is in the privacy policy — the Smart Screen Analysis section covers this feature specifically.
Stuck, or something on screen doesn't match what's described here? Email support@77sparx.com. If you're still setting Hubbub up, the Mac install walkthrough covers the steps before this one.